Using a Raspberry for multimedia application is something quite interesting. Beginning of November 2015 version 6 (as of today version 6.0.3 is current) of OpenELEC has been released bringing a new version of Kodi (formerly known as XBMC) to your Raspi. Unfortunately creating a bootable SD card is not straightforward if you’re Windows-centric. The distributed tar archive contains a script for creating such a SD card under Linux only. But creating the SD card under Windows is not that complicated.
Under Windows the following ingredients are required
- a properly formatted SD card
- the distribution archive
Formatting the SD card
A properly formatted SD card for OpenELEC requires to have two partition on it whereas one of them is formated with an ext4 filesystem. This requires a third party tool like the MiniTool® Partition Wizard. It happens that MiniTool is offering a Home Edition which is free for home use only.
After inserting a new SD card and starting the Partition Wizard you’ll get something like this:
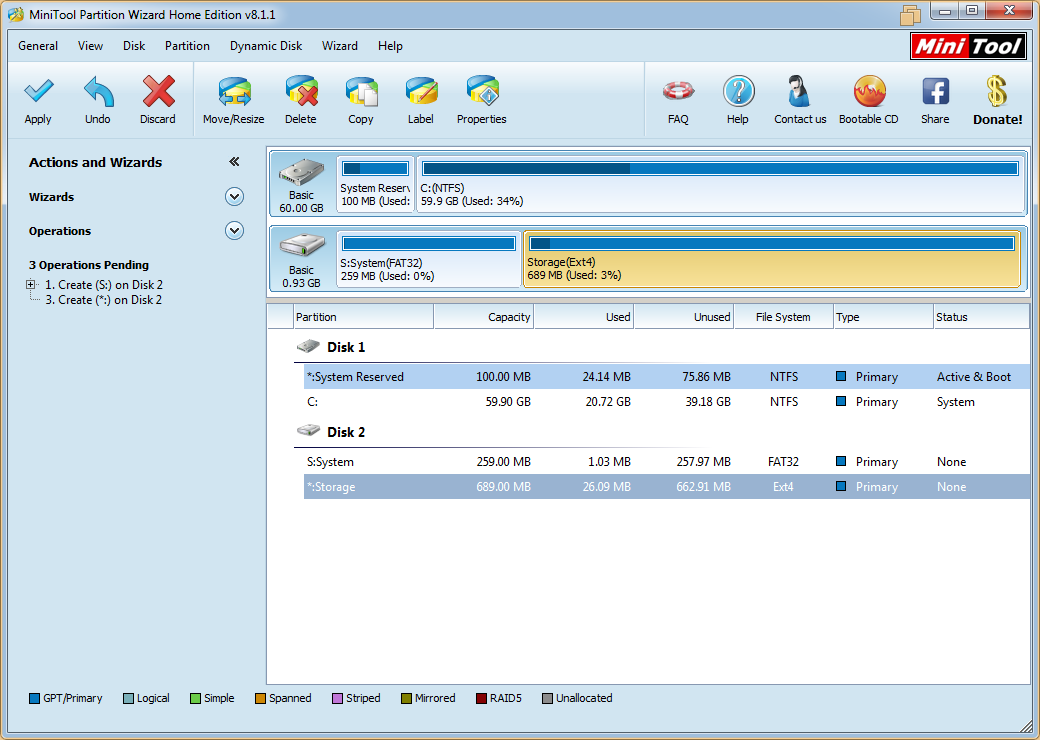
 For this tutorial I used a spare 1 GB card with a FAT32 partition. The first step is deleting all partitions and then create the first one afterwards.
 The original script is creating a FAT32 partition occupying approx. 260 MB, i.e. the size was doubled compared to former versions. So did I and named it “System”. In addition I assigned drive letter S: to it (the assigned drive letter will be used later).
 On the left side of the Partition Wizard you can follow the actions that will be performed upon apply. Next the ext4 partition is created and named “Storage” consuming the remaining space on the card. You will receive a warning stating that Windows will only show the very first partition on a removable media. Acceptable in our case.
 The new partition layout now should look similar to this:
 At this point the modifications can be applied (via the button “Apply” in the upper left) and in a last step the first partition will be marked as “Active” (right-click over the partition; Modify → Set Active).
 Copying OpenELEC to the SD card

The distribution comes as compressed tar archive which needs to be extracted first (7zip will do this job). At the end you should have a folder OpenELEC-RPi.arm-6.0.3 containing the distribution. NOTE: If you intend to use the SD card for the new Raspberry Pi 2 you need to use a different archive. Your files will then be in a folder OpenELEC-RPi2.arm-6.0.3.
Assuming that you have assigned drive letter S: to the SD card the following sequence will copy the required files to the card:
cd OpenELEC-RPi.arm-6.0.3copy target\KERNEL S:\kernel.img copy target\SYSTEMS:\copy 3rdparty\bootloader\*.*S:\copy openelec.icoS:\copy README.mdS:\
The command sequence for a Pi2 is similar. Just change the first command to
cd OpenELEC-RPi2.arm-6.0.3Last but not least you need to create a file ‘cmdline.txt’ on the SD card with the following content:
boot=/dev/mmcblk0p1 disk=/dev/mmcblk0p2 console=ttyAMA0,115200 kgdboc=ttyAMA0,115200 console=tty1 ssh
That’s it. Insert the SD card into your Raspi and power it on. The Raspberry will boot OpenELEC 6.0.3.

Im having trouble adding the cmd file. Im using windows 7 and cannot access the drive any longer to add it. It just wants me to formatt it.
Did you format the first partition with the correct filesystem?
Another issue I found is that if you don’t give it a drive letter when you set it up, windows wont recognize the SD. Also set the primary to active partition.
Thanks for your great tutorial. i have installed my openelec to my 8GB SDcard with 2 partition. i also notice the speed has improved and i can also save my files and create back up in storage ext4 partition.
I don’t understand what you mean by the cmdline.txt file or exactly how to copy the extracted file onto the sd card. What do you use to put the file on the sd card? And how to create the cmdline.txt file?
In Windows go to Start and in the “Search Programs and Files…” box type cmd. This will load the DOS command prompt. From there you can change directory “cd” to the directory that you copied your extracted archive to. Simply type the commands provided above. To create the cmdfile.txt go to Windows Explorer, click on your SD card to open the root, right click for New \ File… I think you will get the rest.
This method has certainly created a working OpenELEC-RPi.arm-4.0.5 sd card for me today – all I need to do now is tell it to find the BBC iPlayer which I sure hope will be easy enough but meanwhile my daughter has reclaimed the TV !
For the total NOOB (like me), go to the Raspberry Pi Foundation web site and download the NOOB self installer pack. This will do the installation for openELEC, Raspian and others. Of course your left with nothing to learn but you do get your XBMC set up super fast…..
…and after a while return here and learn what NOOBS is doing. Agree.
Just rename it to installer.img.gz and use the raspbmc win32 installer
Quick thanks. For some reason this time ’round, the official instructions weren’t working for me after several tries. This “do it manually” did the trick first go.
So I understand how this is all done but why is it the drive must be partioned and can I access the storage section of my sd card using Kodi? I was gonna put on some downloaded repository zip files into storage in the hope that I could access them or would I have to put those in a seperate folder in the s: drive?
thanks again for the tutorial
Not sure if my last post went through had to log in etc.
What I was wanting to ask is why is it I have to partion the drive? I was hoping to move some repository zip files onto the storage partion and access them using kodi on the rspi , is this possible? Or would I have to save those in a seperate folder on the s: portion?
Oh and thanks for the tutorial :)
Thank you so much for the tutorial! Great stuff and took me back to good ol’ times when I had to re-format and partition my 100 MB(!) HDD with PQMagic from a 3.5″ floppy and had to decide whether I wanted to run Windows OR my games. :-)
Thanks!! is a good way to go back to older versions of OpenELEC, also, late 80’s Deja Vu.
Thank you very much! Great tutorial, perfectly updated my raspi with kodi :-)
Works as expected. Thanks a lot for excellent blog.